Advanced Airbags
Your front airbags have advanced features to help reduce the likelihood of airbag related injuries to smaller occupants.
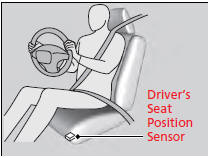
The driver's advanced front airbag system includes a seat position sensor. If the seat is too far forward, the airbag inflates with less force, regardless of the severity of the impact.
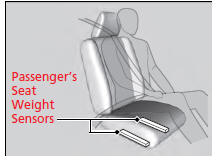
The passenger's advanced front airbag system has weight sensors. Although we recommend against carrying an infant or small child in front, if the sensors detect the weight of a child (up to about 65 lbs or 29 kg), the system will automatically turn off the passenger's front airbag.
Advanced Airbags
If there is a problem with the driver's seat position sensor, the SRS indicator will come on and the airbag will inflate with full (normal) force, regardless of the driver's seating position. For both advanced front airbags to work properly: • Do not spill any liquid on or under the seats. • Do not put any object under the passenger’s seat. • Make sure any objects are positioned properly on the floor. Improperly positioned objects can interfere with the advanced airbag sensors. • All occupants should sit upright and wear their seat belts properly. • Do not place any cover over the passenger side dashboard. Make sure the floor mat behind the front passenger's seat is hooked to the floor mat anchor. An improperly placed mat can interfere with the advanced airbag sensors.
See also:
If the Charging System Indicator Comes On
Reasons for the indicator to come on
Comes on when the battery is not being charged.
What to do when the indicator comes on
Turn off the climate control system, rear defogger, and other electrica ...
Checking Tires
To safely operate your vehicle, your tires must be of the proper type and
size, in
good condition with adequate tread, and properly inflated.
Inflation guidelines
Properly inflated tires provide ...
Using the Master Door Lock Switch
Press the master door lock switch in as shown
to lock or unlock all doors.
Using the Master Door Lock Switch
When you lock/unlock either front door using the
master door lock switch, all the oth ...
